Power not comming to Computer but Monitor is on.

What Happens: In this case Monitor is taking
pc repair picpower from Main Power supply unit. Here from the input  point of the power supply unit power is comming by parallel process to the outlet of the monitor.So there is no relation between power to the monitor and to the CPU.Here the input voltage is 220 volt which is comming to the monitor.So the main problem is with the Power Supply Circuit. If the power supply is damaged then the fan will not move.
Cause & Solve:  1) The fuse of the Power Supply Unit can be burned so it should be checked. If it happens then it should be replaced.
2) In the power supply unit you have to look for that no parts(Resistance,Diode,Capacitor) of it has not been burned or not.If something is burned then it should be replaced.
3) If by the above ways the problem is still then you have take help of a Multi Meter/AVO which can measure any parts that you feel not well.If any fault in any parts is detected then should have to be replaced.
4) Even in many cases Dry soldering is needed to solve this.

Power Not comming to Monitor and Computer.

“ Here I have to mention that Monitor is Monitor_not_comming taking power from computer power supply “


What is the Cause Behind this and How to solve this?
Ans: (BASIC TECHNICS)    1) Power connection can be loose from computer power supply. So power connection should be checked.
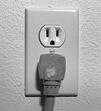
2) Wall socket’s wall-socket plug can be damaged or power is not comming to outlet. So plug’s connection and power in socket should be checked.


3) Power Cord’sPower_cord continuity should be checked.


Hope this basic tips can make ur problem solved.

How to remove/make write protection from your Externel Memory Storage.

It is the most common problem for us.Sometime we see that out pendrive/memory card/usb drives hasbecome write protected we can’t even format the device.
Now I will let u know what this is all about.
What is write protected error?
Ans: If i say my pen-drive has become write protected so in this state i can’t copy anything to my pendrive.I can’t format it. So it has become useless for me.
What is the reason behind this Error?
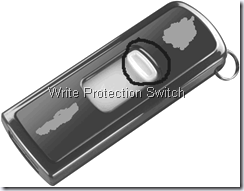
Ans: 1) In your Usb Drive there might be a switch which is turned on and made ur usb Drive Write protected.
         2) This can be caused by some virus which make some changes in the registry editor that makes the usb drive write protected.
        3) It can be a Hardware fault.
What is the solution To it?
Ans: 1) First Solution: First look for the switch that can make the externel drive Write Protected.If u find it switch this to another side to turned the protection Off.(If your externel drive doesn’t have that kind of switch then skip it.)
Write_Protect2) Second Solution: Yes it can occur without the switch but not really to worroy about. First  download this software to execute a low-level-format  on your externel device.Now after you have made the low-level-format u have to set the file system and cluster size to your external drive it means u have to partion the drive.
Now to do that:
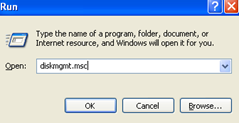
1) Go to Run/windows key + r .Type diskmgmt.msc to open disk management window.
run
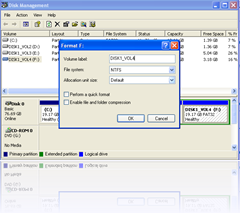
 2)The window will look like this.In the disk-mnagement window select the externel drive and right click on it to format it. Now choose the File System and Allocation Unit Size and do not check the boxes below.
diskmanagement
 Then click ok to format and then u can use the externel drive again.
3)Third Solution:  If any of the above solution is not suitable for u means the above things  are  not working for  ur case then u must try this (or u can also try this before the above two solutions.)
For this Process:
1) Open registry editor by typing regedit in run(Windows key + r).
2) Navigate to the following path:
HKEY_LOCAL_MACHINE\SYSTEM\CurrentControlSet\Control\
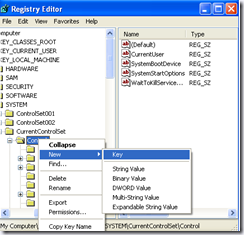
3) Find a sub key inside it named “StorageDevicePolicies”. If it does not exist there then we need to make it. Right click on “Control” key -> New -> Key. Name it  “StorageDevicePolicies” without quotes.
key
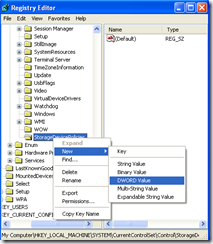
 4) Now right click on the new created key and click new  -> DWORD Value and name it “write protect” without quotes.
Dword_value
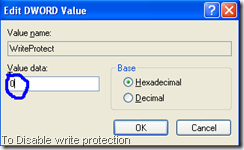
 5) Right click on the WriteProtect key it to edit the DWORD Value.Make it 0.
value
6) Click ok and refresh it  using F5 and restart the computer.Now u can acces ur externel drive.If this also doesn’t work then u have to buy a new usb drive.I hope this solutions will work for u.
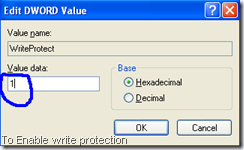
****If u want to make ur pen-drive write protected just change the DWORD Value to 1,then refresh it using F5 and restart it. ******
change_the_value Now to get back acces to ur pendrive change it to 0.Then again u have to refresh it and restart the computer.

How to create CON Folder.

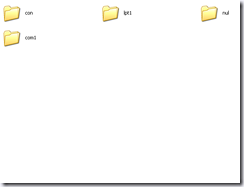
Can you create a folder with names con ,aux , nul ,lpt1 ,com1 or file name as "con".

Now you tell me how can we as it was global format..

It was created as default....

But  if you want to make a folder name con,aux,nul,lpt1,com1...

Then what u have to do that i can tell u...

ad


Just   type  the name you want make the folder name(ex: con,com1,aux,nul,lpt1) then press ALT + 0160(from numpad) and you have got your folder with the name "CON".

Why PC Crashes.

Fatal error: the system has become unstable or is busy," it says. "Enter to return to Windows or press Control-Alt-Delete to restart your computer. If you do this you will lose any unsaved information in all open applications."
 crash
 You have just been struck by the Blue Screen of Death. Anyone who uses Mcft Windows will be familiar with this. What can you do? More importantly, how can you prevent it happening?
1 Hardware conflict
The number one reason why Windows crashes is hardware conflict. Each hardware device communicates to other devices through an interrupt request channel (IRQ). These are supposed to be unique for each device.
For example, a printer usually connects internally on IRQ 7. The keyboard usually uses IRQ 1 and the floppy disk drive IRQ 6. Each device will try to hog a single IRQ for itself.
If there are a lot of devices, or if they are not installed properly, two of them may end up sharing the same IRQ number. When the user tries to use both devices at the same time, a crash can happen. The way to check if your computer has a hardware conflict is through the following route:
* Start-Settings-Control Panel-System-Device Manager.
Often if a device has a problem a yellow '!' appears next to its description in the Device Manager. Highlight Computer (in the Device Manager) and press Properties to see the IRQ numbers used by your computer. If the IRQ number appears twice, two devices may be using it.
Sometimes a device might share an IRQ with something described as 'IRQ holder for PCI steering'. This can be ignored. The best way to fix this problem is to remove the problem device and reinstall it.
Sometimes you may have to find more recent drivers on the internet to make the device function properly. A good resource is www.driverguide.com. If the device is a soundcard, or a modem, it can often be fixed by moving it to a different slot on the motherboard (be careful about opening your computer, as you may void the warranty).
When working inside a computer you should switch it off, unplug the mains lead and touch an unpainted metal surface to discharge any static electricity.
To be fair to Mcft, the problem with IRQ numbers is not of its making. It is a legacy problem going back to the first PC designs using the IBM 8086 chip. Initially there were only eight IRQs. Today there are 16 IRQs in a PC. It is easy to run out of them. There are plans to increase the number of IRQs in future designs.
2 Bad Ram
Ram (random-access memory) problems might bring on the blue screen of death with a message saying Fatal Exception Error. A fatal error indicates a serious hardware problem. Sometimes it may mean a part is damaged and will need replacing.
But a fatal error caused by Ram might be caused by a mismatch of chips. For example, mixing 70-nanosecond (70ns) Ram with 60ns Ram will usually force the computer to run all the Ram at the slower speed. This will often crash the machine if the Ram is overworked.
One way around this problem is to enter the BIOS settings and increase the wait state of the Ram. This can make it more stable. Another way to troubleshoot a suspected Ram problem is to rearrange the Ram chips on the motherboard, or take some of them out. Then try to repeat the circumstances that caused the crash. When handling Ram try not to touch the gold connections, as they can be easily damaged.
Parity error messages also refer to Ram. Modern Ram chips are either parity (ECC) or non parity (non-ECC). It is best not to mix the two types, as this can be a cause of trouble.
EMM386 error messages refer to memory problems but may not be connected to bad Ram. This may be due to free memory problems often linked to old Dos-based programmes.
3 BIOS settings
Every motherboard is supplied with a range of chipset settings that are decided in the factory. A common way to access these settings is to press the F2 or delete button during the first few seconds of a boot-up.
Once inside the BIOS, great care should be taken. It is a good idea to write down on a piece of paper all the settings that appear on the screen. That way, if you change something and the computer becomes more unstable, you will know what settings to revert to.
A common BIOS error concerns the CAS latency. This refers to the Ram. Older EDO (extended data out) Ram has a CAS latency of 3. Newer SDRam has a CAS latency of 2. Setting the wrong figure can cause the Ram to lock up and freeze the computer's display.
Mcft Windows is better at allocating IRQ numbers than any BIOS. If possible set the IRQ numbers to Auto in the BIOS. This will allow Windows to allocate the IRQ numbers (make sure the BIOS setting for Plug and Play OS is switched to 'yes' to allow Windows to do this.).
4 Hard disk drives
After a few weeks, the information on a hard disk drive starts to become piecemeal or fragmented. It is a good idea to defragment the hard disk every week or so, to prevent the disk from causing a screen freeze. Go to
* Start-Programs-Accessories-System Tools-Disk Defragmenter
This will start the procedure. You will be unable to write data to the hard drive (to save it) while the disk is defragmenting, so it is a good idea to schedule the procedure for a period of inactivity using the Task Scheduler.
The Task Scheduler should be one of the small icons on the bottom right of the Windows opening page (the desktop).
Some lockups and screen freezes caused by hard disk problems can be solved by reducing the read-ahead optimisation. This can be adjusted by going to
* Start-Settings-Control Panel-System Icon-Performance-File System-Hard Disk.
Hard disks will slow down and crash if they are too full. Do some housekeeping on your hard drive every few months and free some space on it. Open the Windows folder on the C drive and find the Temporary Internet Files folder. Deleting the contents (not the folder) can free a lot of space.
Empty the Recycle Bin every week to free more space. Hard disk drives should be scanned every week for errors or bad sectors. Go to
* Start-Programs-Accessories-System Tools-ScanDisk
Otherwise assign the Task Scheduler to perform this operation at night when the computer is not in use.
5 Fatal OE exceptions and VXD ERRORS
Fatal OE exception errors and VXD errors are often caused by video card problems.
These can often be resolved easily by reducing the resolution of the video display. Go to
* Start-Settings-Control Panel-Display-Settings
Here you should slide the screen area bar to the left. Take a look at the colour settings on the left of that window. For most desktops, high colour 16-bit depth is adequate.
If the screen freezes or you experience system lockups it might be due to the video card. Make sure it does not have a hardware conflict. Go to
* Start-Settings-Control Panel-System-Device Manager
Here, select the + beside Display Adapter. A line of text describing your video card should appear. Select it (make it blue) and press properties. Then select Resources and select each line in the window. Look for a message that says No Conflicts.
If you have video card hardware conflict, you will see it here. Be careful at this point and make a note of everything you do in case you make things worse.
The way to resolve a hardware conflict is to uncheck the Use Automatic Settings box and hit the Change Settings button. You are searching for a setting that will display a No Conflicts message.
Another useful way to resolve video problems is to go to
* Start-Settings-Control Panel-System-Performance-Graphics
Here you should move the Hardware Acceleration slider to the left. As ever, the most common cause of problems relating to graphics cards is old or faulty drivers (a driver is a small piece of software used by a computer to communicate with a device).
Look up your video card's manufacturer on the internet and search for the most recent drivers for it.
6 Viruses
Often the first sign of a virus infection is instability. Some viruses erase the boot sector of a hard drive, making it impossible to start. This is why it is a good idea to create a Windows start-up disk. Go to
* Start-Settings-Control Panel-Add/Remove Programs
Here, look for the Start Up Disk tab. Virus protection requires constant vigilance.
A virus scanner requires a list of virus signatures in order to be able to identify viruses. These signatures are stored in a DAT file. DAT files should be updated weekly from the website of your antivirus software manufacturer.
An excellent antivirus programme is McAfee VirusScan by Network Associates ( www.nai.com). Another is Norton AntiVirus 2000, made by Symantec ( www.symantec.com).
7 Printers
The action of sending a document to print creates a bigger file, often called a postscript file.
Printers have only a small amount of memory, called a buffer. This can be easily overloaded. Printing a document also uses a considerable amount of CPU power. This will also slow down the computer's performance.
If the printer is trying to print unusual characters, these might not be recognised, and can crash the computer. Sometimes printers will not recover from a crash because of confusion in the buffer. A good way to clear the buffer is to unplug the printer for ten seconds. Booting up from a powerless state, also called a cold boot, will restore the printer's default settings and you may be able to carry on.
8 Software
A common cause of computer crash is faulty or badly-installed software. Often the problem can be cured by uninstalling the software and then reinstalling it. Use Norton Uninstall or Uninstall Shield to remove an application from your system properly. This will also remove references to the programme in the System Registry and leaves the way clear for a completely fresh copy.
The System Registry can be corrupted by old references to obsolete software that you thought was uninstalled. Use Reg Cleaner by Jouni Vuorio to clean up the System Registry and remove obsolete entries. It works on Windows 95, Windows 98, Windows 98 SE (Second Edition), Windows Millennium Edition (ME), NT4 and Windows 2000.
Read the instructions and use it carefully so you don't do permanent damage to the Registry. If the Registry is damaged you will have to reinstall your operating system. Reg Cleaner can be obtained from www.jv16.org
Often a Windows problem can be resolved by entering Safe Mode. This can be done during start-up. When you see the message "Starting Windows" press F4. This should take you into Safe Mode.
Safe Mode loads a minimum of drivers. It allows you to find and fix problems that prevent Windows from loading properly.
Sometimes installing Windows is difficult because of unsuitable BIOS settings. If you keep getting SUWIN error messages (Windows setup) during the Windows installation, then try entering the BIOS and disabling the CPU internal cache. Try to disable the Level 2 (L2) cache if that doesn't work.
Remember to restore all the BIOS settings back to their former settings following installation.
9 Overheating
Central processing units (CPUs) are usually equipped with fans to keep them cool. If the fan fails or if the CPU gets old it may start to overheat and generate a particular kind of error called a kernel error. This is a common problem in chips that have been overclocked to operate at higher speeds than they are supposed to.
One remedy is to get a bigger better fan and install it on top of the CPU. Specialist cooling fans/heatsinks are available from www.computernerd.com or www.coolit.com
CPU problems can often be fixed by disabling the CPU internal cache in the BIOS. This will make the machine run more slowly, but it should also be more stable.
10 Power supply problems
With all the new construction going on around the country the steady supply of electricity has become disrupted. A power surge or spike can crash a computer as easily as a power cut.
If this has become a nuisance for you then consider buying a uninterrupted power supply (UPS). This will give you a clean power supply when there is electricity, and it will give you a few minutes to perform a controlled shutdown in case of a power cut.
It is a good investment if your data are critical, because a power cut will cause any unsaved data to be lost.

How to Update BIOS.

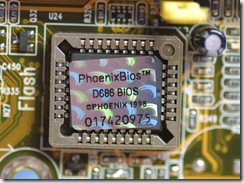
All latest Motherboards today, 486/ Pentium / Pentium Pro/Core to duo/Duo core...,ensure that upgrades are easily obtained by incorporating the system BIOS in a FLASH Memory component. With FLASH BIOS, there is no need to replace an EPROM component. Once downloaded, the upgrade utility fits on a floppy disc allowing the user to save, verify and update the system BIOS. A hard drive or a network drive can also be used to run the newer upgrade utilities. However, memory managers can not be installed while upgrading.
BIOS
 Most pre-Pentium motherboards do not have a Flash BIOS. The following instructions therefore do not apply to these boards. If your motherboard does not have a Flash BIOS (EEPROM) you will need to use an EPROM programmer to re-program the BIOS chip. See your dealer for more information about this.
Please read the following instructions in full before starting a Flash BIOS upgrade:
A. Create a Bootable Floppy (in DOS)
•With a non-formatted disk, type the following:
format a:/s
•If using a formatted disk, type:
sys a:
This procedure will ensure a clean boot when you are flashing the new BIOS.
B. Download the BIOS file
•Download the correct BIOS file by clicking on the file name of the BIOS file you wish to download.
•Save the BIOS file and the Flash Utility file in the boot disk you have created. Unzip the BIOS file and the flash utility file. If you don't have an "unzip" utility, download the WinZip for Windows 95 shareware/ evaluation copy for that one time use from _www.winzip.com or _www.pkware.com. Most CD ROMs found in computer magazines, have a shareware version of WinZip on them.
•You should have extracted two files:
Flash BIOS utility eg: flash7265.exe (for example)
BIOS eg: 6152J900.bin (example)
Use the latest flash utility available unless otherwise specified (either on the BIOS update page or in the archive file). This information is usually provided.
C. Upgrade the System BIOS
During boot up, write down the old BIOS version because you will need to use it for the BIOS backup file name.
Place the bootable floppy disk containing the BIOS file and the Flash Utility in drive a, and reboot the system in MS-DOS, preferably Version 6.22
•At the A:> prompt, type the corresponding Flash BIOS utility and the BIOS file with its extension.
For example:
flash625 615j900.bin
•From the Flash Memory Writer menu, select "Y" to "Do you want to save BIOS?" if you want to save (back up) your current BIOS (strongly recommended), then type the name of your current BIOS and its extension after FILE NAME TO SAVE: eg: a:\613J900.bin
Alternatively select "N" if you don't want to save your current BIOS. Beware, though, that you won't be able to recover from a possible failure.
•Select "Y" to "Are you sure to program?"
•Wait until it displays "Message: Power Off or Reset the system"
Once the BIOS has been successfully loaded, remove the floppy disk and reboot the system. If you write to BIOS but cannot complete the procedure, do not switch off, because the computer will not be able to boo, and you will not be given another chance to flash. In this case leave your system on until you resolve the problem (flashing BIOS with old file is a possible solution, provided you've made a backup before)
Make sure the new BIOS version has been loaded properly by taking note of the BIOS identifier as the system is rebooting.
For AMI BIOS
Once the BIOS has been successfully loaded, remove the floppy disk and reboot the system holding the "END" key prior to power on until you enter CMOS setup. If you do not do this the first time booting up after upgrading the BIOS, the system will hang.
BIOS Update Tips
note:
1.Make sure never to turn off or reset your computer during the flash process. This will corrupt the BIOS data. We also recommend that you make a copy of your current BIOS on the bootable floppy so you can reflash it if you need to. (This option is not available when flashing an AMI BIOS).
2. If you have problems installing your new BIOS please check the following:
Have you done a clean boot?
In other words, did you follow the above procedure for making a bootable floppy? This ensures that when booting from "A" there are no device drivers on the diskette. Failing to do a clean boot is the most common cause for getting a "Memory Insufficient" error message when attempting to flash a BIOS.
If you have not used a bootable floppy, insure a clean boot either by
a) pressing F5 during bootup
b) by removing all device drivers on the CONFIG.SYS including the HIMEM.SYS. Do this by using the EDIT command.
Have you booted up under DOS?
Booting in Windows is another common cause for getting a "Memory Insufficient" error message when attempting to flash a BIOS. Make sure to boot up to DOS with a minimum set of drivers. Important: Booting in DOS does not mean selecting "Restart computer in MS-DOS Mode" from Windows98/95 shutdown menu or going to Prompt mode in WindowsNT, but rather following the above procedure (format a: /s and rebooting from a:\).
Have you entered the full file name of the flash utility and the BIOS plus its extension?
Do not forget that often you will need to add a drive letter (a:\) before flashing the BIOS. Example: when asked for file name of new BIOS file which is on your floppy disk, in case you're working from c:\ your will need to type a:\615j900.bin, rather than 615j900.bin only.
For more information go to here.

How To Speed Up WinXP.(Top 23 ways)

Since defragging the disk won't do much to improve Windows XP performance, here are  suggestions that will help to enhance the performance and reliability of your customers  PCs. Best of all, most of them will cost you nothing.
Speedup_WinXP

1) To decrease a system's boot time and increase system performance, use the money you save by not buying defragmentation software -- the built-in Windows defragmenter works just fine -- and instead equip the computer with an Ultra-133 or Serial ATA hard drive with 8-MB cache buffer.
2) If a PC has less than 512 MB of RAM, add more memory. This is a relatively inexpensive and easy upgrade that can dramatically improve system performance.
3) Ensure that Windows XP is utilizing the NTFS file system. If you're not sure, here's how to check: First, double-click the My Computer icon, right-click on the C: Drive, then select Properties. Next, examine the File System type; if it says FAT32, then back-up any important data. Next, click Start, click Run, type CMD, and then click OK. At the prompt, type CONVERT C: /FS:NTFS and press the Enter key. This process may take a while; it's important that the computer be uninterrupted and virus-free. The file system used by the bootable drive will be either FAT32 or NTFS. I highly recommend NTFS for its superior security, reliability, and efficiency with larger disk drives.
4) Disable file indexing. The indexing service extracts information from documents and other files on the hard drive and creates a "searchable keyword index." As you can imagine, this process can be quite taxing on any system.
The idea is that the user can search for a word, phrase, or property inside a document, should they have hundreds or thousands of documents and not know the file name of the document they want. Windows XP's built-in search functionality can still perform these kinds of searches without the Indexing service. It just takes longer. The OS has to open each file at the time of the request to help find what the user is looking for.
Most people never need this feature of search. Those who do are typically in a large corporate environment where thousands of documents are located on at least one server. But if you're a typical system builder, most of your clients are small and medium businesses. And if your clients have no need for this search feature, I recommend disabling it.
Here's how: First, double-click the My Computer icon. Next, right-click on the C: Drive, then select Properties. Uncheck "Allow Indexing Service to index this disk for fast file searching." Next, apply changes to "C: subfolders and files," and click OK. If a warning or error message appears (such as "Access is denied"), click the Ignore All button.
5) Update the PC's video and motherboard chipset drivers. Also, update and configure the BIOS. For more information on how to configure your BIOS properly, see this article on my site.
6) Empty the Windows Prefetch folder every three months or so. Windows XP can "prefetch" portions of data and applications that are used frequently. This makes processes appear to load faster when called upon by the user. That's fine. But over time, the prefetch folder may become overloaded with references to files and applications no longer in use. When that happens, Windows XP is wasting time, and slowing system performance, by pre-loading them. Nothing critical is in this folder, and the entire contents are safe to delete.
7) Once a month, run a disk cleanup. Here's how: Double-click the My Computer icon. Then right-click on the C: drive and select Properties. Click the Disk Cleanup button -- it's just to the right of the Capacity pie graph -- and delete all temporary files.
8) In your Device Manager, double-click on the IDE ATA/ATAPI Controllers device, and ensure that DMA is enabled for each drive you have connected to the Primary and Secondary controller. Do this by double-clicking on Primary IDE Channel. Then click the Advanced Settings tab. Ensure the Transfer Mode is set to "DMA if available" for both Device 0 and Device 1. Then repeat this process with the Secondary IDE Channel.
9) Upgrade the cabling. As hard-drive technology improves, the cabling requirements to achieve these performance boosts have become more stringent. Be sure to use 80-wire Ultra-133 cables on all of your IDE devices with the connectors properly assigned to the matching Master/Slave/Motherboard sockets. A single device must be at the end of the cable; connecting a single drive to the middle connector on a ribbon cable will cause signaling problems. With Ultra DMA hard drives, these signaling problems will prevent the drive from performing at its maximum potential. Also, because these cables inherently support "cable select," the location of each drive on the cable is important. For these reasons, the cable is designed so drive positioning is explicitly clear.
10) Remove all spyware from the computer. Use free programs such as AdAware by Lavasoft or SpyBot Search & Destroy. Once these programs are installed, be sure to check for and download any updates before starting your search. Anything either program finds can be safely removed. Any free software that requires spyware to run will no longer function once the spyware portion has been removed; if your customer really wants the program even though it contains spyware, simply reinstall it. For more information on removing Spyware visit this Web Pro News page.
11) Remove any unnecessary programs and/or items from Windows Startup routine using the MSCONFIG utility. Here's how: First, click Start, click Run, type MSCONFIG, and click OK. Click the StartUp tab, then uncheck any items you don't want to start when Windows starts. Unsure what some items are? Visit the WinTasks Process Library. It contains known system processes, applications, as well as spyware references and explanations. Or quickly identify them by searching for the filenames using Google or another Web search engine.
12) Remove any unnecessary or unused programs from the Add/Remove Programs section of the Control Panel.
13) Turn off any and all unnecessary animations, and disable active desktop. In fact, for optimal performance, turn off all animations. Windows XP offers many different settings in this area. Here's how to do it: First click on the System icon in the Control Panel. Next, click on the Advanced tab. Select the Settings button located under Performance. Feel free to play around with the options offered here, as nothing you can change will alter the reliability of the computer -- only its responsiveness.
14) If your customer is an advanced user who is comfortable editing their registry, try some of the performance registry tweaks offered at Tweak XP.
15) Visit Microsoft's Windows update site regularly, and download all updates labeled Critical. Download any optional updates at your discretion.
16) Update the customer's anti-virus software on a weekly, even daily, basis. Make sure they have only one anti-virus software package installed. Mixing anti-virus software is a sure way to spell disaster for performance and reliability.
17) Make sure the customer has fewer than 500 type fonts installed on their computer. The more fonts they have, the slower the system will become. While Windows XP handles fonts much more efficiently than did the previous versions of Windows, too many fonts -- that is, anything over 500 -- will noticeably tax the system.
18) Do not partition the hard drive. Windows XP's NTFS file system runs more efficiently on one large partition. The data is no safer on a separate partition, and a reformat is never necessary to reinstall an operating system. The same excuses people offer for using partitions apply to using a folder instead. For example, instead of putting all your data on the D: drive, put it in a folder called "D drive." You'll achieve the same organizational benefits that a separate partition offers, but without the degradation in system performance. Also, your free space won't be limited by the size of the partition; instead, it will be limited by the size of the entire hard drive. This means you won't need to resize any partitions, ever. That task can be time-consuming and also can result in lost data.
19) Check the system's RAM to ensure it is operating properly. I recommend using a free program called MemTest86. The download will make a bootable CD or diskette (your choice), which will run 10 extensive tests on the PC's memory automatically after you boot to the disk you created. Allow all tests to run until at least three passes of the 10 tests are completed. If the program encounters any errors, turn off and unplug the computer, remove a stick of memory (assuming you have more than one), and run the test again. Remember, bad memory cannot be repaired, but only replaced.
20) If the PC has a CD or DVD recorder, check the drive manufacturer's Web site for updated firmware. In some cases you'll be able to upgrade the recorder to a faster speed. Best of all, it's free.
21) Disable unnecessary services. Windows XP loads a lot of services that your customer most likely does not need. To determine which services you can disable for your client, visit the Black Viper site for Windows XP configurations.
22) If you're sick of a single Windows Explorer window crashing and then taking the rest of your OS down with it, then follow this tip: open My Computer, click on Tools, then Folder Options. Now click on the View tab. Scroll down to "Launch folder windows in a separate process," and enable this option. You'll have to reboot your machine for this option to take effect.
23) At least once a year, open the computer's cases and blow out all the dust and debris. While you're in there, check that all the fans are turning properly. Also inspect the motherboard capacitors for bulging or leaks. For more information on this leaking-capacitor phenomena, you can read numerous articles on my site.
Following any of these suggestions should result in noticeable improvements to the performance and reliability of your customers' computers.

How to create Yahoo Messanger with no Ads.

I went into the system registery and found out that Yahoo! moved the 'banner url' key to a slightly different location. Than what it used in version 5.5!
Yahoo Messanger
 Yahoo! IM  no longer uses 'YUrl', but uses 'View' instead. You have to click on each key inside of 'View' and edit the 'banner url' string to anything you want. Simply cleared mine out completely and it works great!!
Here is what you have to do:
Run regedit
Goto HKEY_CURRENT_USER -> Software -> Yahoo -> Pager -> View
Inside the 'View' key there are a several other keys. Go through each one and edit the 'banner url' string to your liking. It even works if the string is left blank (this causes it to look as if ads were never even implemented)!
Restart Yahoo! IM for the effect to take hold.
This is great for Yahoo! IM 6.0 users who don't want to be bothered with ads.

How To Recover Deleted Files From Hard Disk.

If u delete a file can u recover it.Yes if u delete it only from ur local drive to recycle bin then u can recover it by the restore button. Isn’t it!
But If u delete the file even from the recycle bin then can u recover it!!!  Yes U Can…..
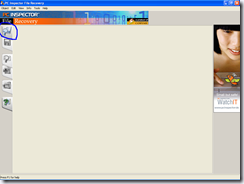
Using PC Inspector File Recovery U can recover ur deleted files.
PCInspectorFile_Recovery
 To download It Click Here:
Download
Example:
Suppose I have create a file a.txt in the drive D:
File_creation
 Then I’m gonna delete it Using Shift+Delete that it can be permanently deleted from the local drive where it is.Then I will recover it using PC file recovery.
File_deleted
 Now I will have the file again.
The steps to have the file back:
1) Open PC Inspector File Recovery and select ur language.Go to Open drive option
PC_Ins_Fl_ReCovery
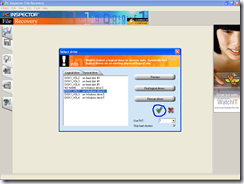
 2) Now after scanning it will show u a window in that select the drive from wich u want to recover ur file and press the highlighted button:(In my case the drive is D:)
PC_Ins_Fl_ReCovery
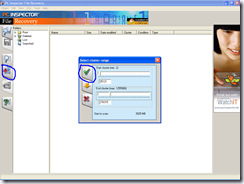
 3) Now press the recover button and select the size of cluster u want to have but make it at least more than 4 to 5000 mb other wise it can’t search ur file and press the highlighted button.
PC_Ins_Fl_ReCovery


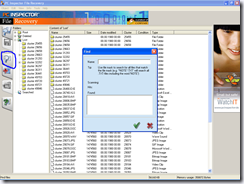
 4) Now u will have some of the files which will display in the recover page.(The total file size will not be more than 5000 mb as u have select that  so u will have someof the files) and find ur files using the find files button.
PC_Ins_Fl_ReCovery
 5) Type the file name there and u will have ur file.

How To Rename Recycle bin.

Have u ever tried to rename recycle bin,It’s a bit difficult if u are a new user to computer.Her is a way to rename recycle bin.Have u ever heard of registry editor(Those who r new users).It keeps the registry of many file’s if u know this well u can do many things urself what anyone even not ever think of !
Now get back to the topic.To change the name of recycle bin :
1) go to start->run.
2) Then type here regedit and hit enter and u will have the registry editor.
3) Navigate to the following registry branch:
HKEY_CLASSES_ROOT\CLSID\{645FF040-5081-101B-9F08-00AA002F954E}\
4) On the right pane, click on LocalizedString.
5) Double click on LocalizedString or right click on LocalizedString and select Modify to modify the registry value.
6) You should see the default value of  “@%SystemRoot%\system32\SHELL32.dll,-8964”.
7) Change it to whatever value u want but remember to have back up for it.  what ever value u will give that will the name of recycle bin.In my case i have given the name Dustbin.
8)Press F5 to refresh it.Now refresh on desktop u get ur renamed recycle bin.
Rename_Recyclebin
 9) To change it back to recycle bin just copy this  @%SystemRoot%\system32\SHELL32.dll,-8964  to that place and u have ur recycle bin(name) back.

Google Secrets.


•๋●๋ Google Secrates ๋●๋๋•
Some google secret words...
just write it in google searchbar & clik i'm feeling lucky
google-search-secrets
Here all  words :
elgoog
google 133t
google gothic
google bsd
google ester egg
xx-piglatin
google linux
ewmew fudd
xx-klingon
see what happens…

How To create a Blank Scrap in Orkut.

1)  Place the cursor in the text field.
blank_scrap
2)  Delete everything in the field.
3)  Now, HOLD (Keep pressed) ALT key and press 0 1 7 3 (Press the numbers one after the another. Do not keep them pressed) on the NUMBER PAD (on the right side of the keyboard).
( If you are using a laptop, just press in the text box.)
4) Click SUBMIT.

All Trojan Horse Ports.

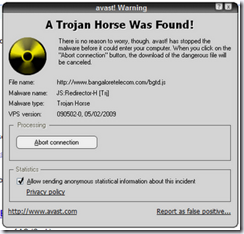
TCP 1 Breach.2001, SocketsDeTroie.230,
Trojan_horse
 SocketsDeTroie.250
TCP 28 Amanda.200
TCP 31 MastersParadise.920
TCP 68 Subseven.100
TCP 142 NetTaxi.180
TCP 146 Infector.141, Intruder.100, Intruder.100
TCP 171 ATrojan.200
TCP 285 WCTrojan.100
TCP 286 WCTrojan.100
TCP 334 Backage.310
TCP 370 NeuroticKat.120, NeuroticKat.130
TCP 413 Coma.109
TCP 420 Breach.450
TCP 555 Id2001.100, PhaseZero.100, StealthSpy.100
TCP 623 Rtb666.160
TCP 660 Zaratustra.100
TCP 661 Noknok.800, Noknok.820
TCP 666 BackConstruction.210, BackConstruction.250, Bla.100, Bla.200, Bla.400, Bla.503, Cain.150, Dimbus.100, Noknok.820, Ripper.100, SatansBackdoor.100, SatansBackdoor.101, SatansBackdoor.102, Unicorn.100, Unicorn.101, Unicorn.110
TCP 667 SniperNet.210, Snipernet.220
TCP 668 Unicorn.101, Unicorn.110
TCP 680 Rtb666.160
TCP 777 Tiny.100, Undetected.230, Undetected.300, Undetected.310, Undetected.320, Undetected.330, Undetected.331, Undetected.332
TCP 785 NetworkTerrorist.100
TCP 800 NeuroticKitten.010
TCP 831 NeuroticKat.100, NeuroticKat.120, NeuroticKat.130
TCP 901 NetDevil.130, NetDevil.140
TCP 1000 DerSpaeher.200
TCP 1001 Silencer.100
TCP 1008 AutoSpy.100
TCP 1010 DerSpaeher.200
TCP 1015 Doly.150
TCP 1111 TPort.100
TCP 1130 Noknok.800, Noknok.820
TCP 1207 SoftWAR.100
TCP 1243 Subseven.100, SubSeven.110, SubSeven.180, SubSeven.190, Subseven.200
TCP 1245 VoodooDoll.006
TCP 1269 Matrix.130
TCP 1480 RemoteHack.130
TCP 1568 RemoteHack.100, RemoteHack.110
TCP 1600 DirectConnection.100
TCP 1601 DirectConnection.100
TCP 1602 DirectConnection.100
TCP 1634 NetCrack.100
TCP 1784 Snid.120, Snid.212
TCP 1999 TransmissionScout.100, TransmissionScout.110
TCP 2000 ATrojan.200, InsaneNetwork.400
TCP 2001 DIRT.220, TrojanCow.100
TCP 2003 TransmissionScout.100, TransmissionScout.110
TCP 2023 RipperPro.100
TCP 2040 InfernoUploader.100
TCP 2115 Bugs.100
TCP 2140 DeepThroat.100, DeepThroat.200, DeepThroat.310
TCP 2332 SilentSpy.202
TCP 2589 Dagger.140
TCP 2600 DigitalRootbeer.100
TCP 2989 Rat.200
TCP 3128 MastersParadise.970
TCP 3129 MastersParadise.920, MastersParadise.970
TCP 3150 DeepThroat.100, DeepThroat.200, DeepThroat.310, MiniBacklash.110
TCP 3215 BlackStar.100, Ghost.230
TCP 3333 Daodan.123
TCP 3410 OptixPro.100, OptixPro.110
TCP 3456 Force.155, TerrorTrojan.100
TCP 3505 AutoSpy.130, AutoSpy.140
TCP 3586 Snid.120, Snid.212
TCP 3700 PortalOfDoom.100
TCP 3723 Mantis.100
TCP 3800 Eclypse.100
TCP 3996 RemoteAnything.364
TCP 4000 SkyDance.220, SkyDance.229
TCP 4201 Wartrojan.160, Wartrojan.200
TCP 4225 SilentSpy.202
TCP 4321 Bobo.100
TCP 4444 AlexTrojan.200, Crackdown.100
TCP 4488 EventHorizon.100
TCP 4523 Celine.100
TCP 4545 InternalRevise.100, RemoteRevise.150
TCP 4567 FileNail.100
TCP 4666 Mneah.100
TCP 4950 ICQTrojan.100
TCP 5005 Aladino.060
TCP 5025 Keylogger.WMRemote.100
TCP 5031 NetMetro.104
TCP 5032 NetMetro.104
TCP 5033 NetMetro.104
TCP 5050 RoxRat.100
TCP 5151 OptixLite.020, OptixLite.030, OptixLite.040
TCP 5190 MBomber.100
TCP 5277 WinShell.400
TCP 5343 WCRat.100
TCP 5400 BackConstruction.120, BackConstruction.150, BladeRunner.080, DeepThroat.300
TCP 5401 BackConstruction.120, BackConstruction.150, BackConstruction.210, BackConstruction.250, BladeRunner.080, DeepThroat.300, Mneah.100
TCP 5402 BackConstruction.210, BackConstruction.250, BladeRunner.080, DeepThroat.300, Mneah.100
TCP 5534 TheFlu.100
TCP 5550 XTCP.200, XTCP.201
TCP 5555 Noxcape.100, Noxcape.200
TCP 5695 Assassin.100
TCP 5714 WinCrash.100
TCP 5741 WinCrash.100
TCP 5742 WinCrash.103
TCP 5802 Y3KRat.160
TCP 5810 Y3KRat.160
TCP 5838 Y3KRat.170
TCP 5858 Y3KRat.110, Y3KRat.120, Y3KRat.140
TCP 5880 Y3KRat.140
TCP 5881 Y3KRat.110, Y3KRat.120, Y3KRat.140
TCP 5882 Y3KRat.100, Y3KRat.110, Y3KRat.120, Y3KRat.140, Y3KRat.150
TCP 5883 Y3KRat.110, Y3KRat.140
TCP 5884 Y3KRat.140, Y3KRat.150
TCP 5885 Y3KRat.110, Y3KRat.120, Y3KRat.140
TCP 5886 Y3KRat.120, Y3KRat.140
TCP 5887 Y3KRat.110, Y3KRat.120, Y3KRat.140
TCP 5888 Y3KRat.100, Y3KRat.110, Y3KRat.120, Y3KRat.140, Y3KRat.150
TCP 5889 Y3KRat.100, Y3KRat.110, Y3KRat.120, Y3KRat.140, Y3KRat.150
TCP 5890 Y3KRat.140
TCP 6400 Thething.100, Thething.150
TCP 6556 AutoSpy.120, AutoSpy.122
TCP 6655 Aqua.020
TCP 6660 LameSpy.095
TCP 6666 LameRemote.100, ProjectMayhem.100
TCP 6669 Vampire.100
TCP 6670 DeepThroat.200, DeepThroat.210
TCP 6671 DeepThroat.310
TCP 6699 HostControl.101
TCP 6711 DeepThroat.300, Noknok.820, SubSeven.180, SubSeven.190
TCP 6712 Subseven.100
TCP 6713 Subseven.100
TCP 6767 NTRC.120
TCP 6776 SubSeven.180, SubSeven.190, Subseven.200
TCP 6789 Doly.200
TCP 6796 SubSeven.214
TCP 6912 ShitHeep.100
TCP 6939 Indoctrination.100
TCP 6953 Lithium.100
TCP 6969 2000Cracks.100, Bigorna.100, Danton.110, Danton.210, Danton.220, Danton.310, Danton.320, Danton.330, GateCrasher.110, NetController.108, Sparta.110, VagrNocker.120
TCP 6970 Danton.330
TCP 7001 Freak88.100
TCP 7119 Massaker.100
TCP 7200 Massaker.110
TCP 7300 Coced.221
TCP 7301 Coced.221
TCP 7306 NetSpy.200, NetSpy.200
TCP 7410 Phoenix.190, Phoenix.200
TCP 7511 Genue.100
TCP 7609 Snid.120, Snid.212
TCP 7614 Wollf.130
TCP 7648 BlackStar.100, Ghost.230
TCP 7788 Last.2000, Matrix.200
TCP 7826 MiniOblivion.010, Oblivion.010
TCP 7887 SmallFun.110
TCP 7891 Revenger.100
TCP 7979 VagrNocker.200
TCP 7997 VagrNocker.200
TCP 8000 XConsole.100
TCP 8011 Way.240
TCP 8012 Ptakks.215, Ptakks.217
TCP 8110 LoseLove.100
TCP 8111 LoseLove.100
TCP 8301 LoseLove.100
TCP 8302 LoseLove.100
TCP 8372 NetBoy.100
TCP 8720 Connection.130
TCP 8734 AutoSpy.110
TCP 8811 Force.155
TCP 8899 Last.2000
TCP 9000 Aristotles.100
TCP 9301 LoseLove.100
TCP 9400 InCommand.100, InCommand.110, InCommand.120, InCommand.130, InCommand.140, InCommand.150, InCommand.153, InCommand.160, InCommand.167, InCommand.170
TCP 9401 InCommand.100, InCommand.110, InCommand.170
TCP 9402 InCommand.100, InCommand.110
TCP 9561 CRatPro.110
TCP 9563 CRatPro.110
TCP 9580 TheefLE.100
TCP 9696 Danton.210, Ghost.230
TCP 9697 Danton.320, Danton.330, Ghost.230
TCP 9870 R3C.100
TCP 9872 PortalOfDoom.100
TCP 9873 PortalOfDoom.100
TCP 9874 PortalOfDoom.100
TCP 9875 PortalOfDoom.100
TCP 9876 Rux.100, SheepGoat.100
TCP 9877 SmallBigBrother.020
TCP 9878 SmallBigBrother.020, TransmissionScout.100, TransmissionScout.110, TransmissionScout.120
TCP 9879 SmallBigBrother.020
TCP 9999 ForcedEntry.100, Infra.100, Prayer.120, Prayer.130, TakeOver.200, TakeOver.300
TCP 10001 DTr.130, DTr.140
TCP 10013 Amanda.200
TCP 10067 PortalOfDoom.100
TCP 10100 Gift.240
TCP 10101 NewSilencer.100
TCP 10167 PortalOfDoom.100
TCP 10528 HostControl.100, HostControl.260
TCP 10607 Coma.109
TCP 10666 Ambush.100
TCP 11011 Amanda.200
TCP 11050 HostControl.101
TCP 11051 HostControl.100, HostControl.260
TCP 11223 AntiNuke.100, Progenic.100, Progenic.110
TCP 11225 Cyn.100, Cyn.103, Cyn.120
TCP 11306 Noknok.800, Noknok.820
TCP 11831 Katux.200, Latinus.140, Latinus.150, Pest.100, Pest.400
TCP 11991 PitfallSurprise.100
TCP 12043 Frenzy.2000
TCP 12345 Fade.100, Netbus.160, Netbus.170, VagrNocker.400
TCP 12346 Netbus.160, Netbus.170
TCP 12348 Bionet.210, Bionet.261, Bionet.280, Bionet.302, Bionet.305, Bionet.311, Bionet.313, Bionet.316, Bionet.317
TCP 12349 Bionet.084, Bionet.261, Bionet.280, Bionet.302, Bionet.305, Bionet.311, Bionet.313, Bionet.314, Bionet.316, Bionet.317, Bionet.401, Bionet.402
TCP 12389 KheSanh.210
TCP 12478 Bionet.210
TCP 12623 Buttman.090, Buttman.100
TCP 12624 Buttman.090, Buttman.100
TCP 12625 Buttman.100
TCP 12904 Akropolis.100, Rocks.100
TCP 13473 Chupacabra.100
TCP 13753 AFTP.010
TCP 14100 Eurosol.100
TCP 14194 CyberSpy.840
TCP 14286 HellDriver.100
TCP 14500 PCInvader.050, PCInvader.060, PCInvader.070
TCP 14501 PCInvader.060, PCInvader.070
TCP 14502 PCInvader.050, PCInvader.060, PCInvader.070
TCP 14503 PCInvader.050, PCInvader.060, PCInvader.070
TCP 14504 PCInvader.050, PCInvader.060
TCP 15092 HostControl.100, HostControl.260
TCP 15382 SubZero.100
TCP 15432 Cyn.210
TCP 15555 ICMIBC.100
TCP 16322 LastDoor.100
TCP 16484 MoSucker.110
TCP 16661 Dfch.010
TCP 16969 Progenic.100
TCP 16982 AcidShiver.100
TCP 17300 Kuang.200
TCP 17499 CrazzyNet.370, CrazzyNet.375, CrazzyNet.521
TCP 17500 CrazzyNet.370, CrazzyNet.375, CrazzyNet.521
TCP 17569 Infector.141, Infector.160, Infector.170, Infector.180, Infector.190, Infector.200, Intruder.100, Intruder.100
TCP 17593 AudioDoor.120
TCP 19191 BlueFire.035, BlueFire.041
TCP 19604 Metal.270
TCP 19605 Metal.270
TCP 19991 Dfch.010
TCP 20000 Millenium.100
TCP 20001 Millenium.100, PshychoFiles.180
TCP 20002 AcidKor.100, PshychoFiles.180
TCP 20005 MoSucker.200, MoSucker.210, MoSucker.220
TCP 21212 Schwindler.182
TCP 21554 Exploiter.100, Exploiter.110, Girlfriend.130, GirlFriend.135
TCP 21579 Breach.2001
TCP 21584 Breach.2001
TCP 21684 Intruse.134
TCP 22068 AcidShiver.110
TCP 22115 Cyn.120
TCP 22222 Prosiak.047, Ruler.141, Rux.300, Rux.400, Rux.500, Rux.600
TCP 22223 Rux.400, Rux.500, Rux.600
TCP 22456 Bla.200, Bla.503
TCP 22457 AcidShiver.120, Bla.200, Bla.503
TCP 22784 Intruzzo.110
TCP 22845 Breach.450
TCP 22847 Breach.450
TCP 23005 Infinaeon.110, NetTrash.100, Oxon.110, WinRat.100
TCP 23006 Infinaeon.110, NetTrash.100, Oxon.110, WinRat.100
TCP 23032 Amanda.200
TCP 23432 Asylum.010, Asylum.012, Asylum.013, Asylum.014, MiniAsylum.110
TCP 23456 EvilFTP.100, VagrNocker.400
TCP 23476 DonaldDick.153, DonaldDick.154, DonaldDick.155
TCP 23477 DonaldDick.153
TCP 24000 Infector.170
TCP 24307 Wildek.020
TCP 25386 MoonPie.220
TCP 25486 MoonPie.220
TCP 25555 FreddyK.100, FreddyK.200
TCP 25556 FreddyK.100
TCP 25685 MoonPie.010, MoonPie.012, MoonPie.130, MoonPie.220, MoonPie.240, MoonPie.400
TCP 25686 MoonPie.135, MoonPie.200, MoonPie.400
TCP 25982 MoonPie.135, MoonPie.200
TCP 26274 Delta.050
TCP 27160 MoonPie.135, MoonPie.200
TCP 27184 Alvgus.100, Alvgus.800
TCP 27374 Muerte.110, Subseven.210, SubSeven.213
TCP 28429 Hack'a'Tack.2000
TCP 28430 Hack'a'Tack.2000
TCP 28431 Hack'a'Tack.2000
TCP 28432 Hack'a'Tack.2000
TCP 28433 Hack'a'Tack.2000
TCP 28434 Hack'a'Tack.2000
TCP 28435 Hack'a'Tack.2000
TCP 28436 Hack'a'Tack.2000
TCP 29559 DuckToy.100, DuckToy.101, Katux.200, Latinus.140, Latinus.150, Pest.100, Pest.400
TCP 29891 Unexplained.100
TCP 30000 Infector.170
TCP 30001 Error32.100
TCP 30003 LamersDeath.100
TCP 30029 AOLTrojan.110
TCP 30100 NetSphere.127, NetSphere.130, NetSphere.131
TCP 30101 NetSphere.127, NetSphere.130, NetSphere.131
TCP 30102 NetSphere.127, NetSphere.130, NetSphere.131
TCP 30103 NetSphere.131
TCP 30947 Intruse.134
TCP 31320 LittleWitch.400, LittleWitch.420
TCP 31337 BackOrifice.120, Khaled.100, OPC.200
TCP 31415 Lithium.101
TCP 31416 Lithium.100, Lithium.101
TCP 31557 Xanadu.110
TCP 31631 CleptoManicos.100
TCP 31745 Buschtrommel.100, Buschtrommel.122
TCP 31785 Hack'a'Tack.100, Hack'a'Tack.112
TCP 31787 Hack'a'Tack.100, Hack'a'Tack.112
TCP 31789 Hack'a'Tack.100, Hack'a'Tack.112
TCP 31791 Hack'a'Tack.100, Hack'a'Tack.112
TCP 31887 BDDT.100
TCP 31889 BDDT.100
TCP 32100 ProjectNext.053
TCP 32418 AcidBattery.100
TCP 32791 Akropolis.100, Rocks.100
TCP 33291 RemoteHak.001
TCP 33333 Blackharaz.100, Prosiak.047, SubSeven.214
TCP 33577 SonOfPsychward.020
TCP 34324 TelnetServer.100
TCP 34763 Infector.180, Infector.190, Infector.200
TCP 35000 Infector.190, Infector.200
TCP 35600 Subsari.140
TCP 36794 BugBear.100
TCP 37237 Mantis.020
TCP 37651 YAT.210
TCP 37653 YAT.310
TCP 40308 Subsari.140
TCP 40412 TheSpy.100
TCP 40421 MastersParadise.970
TCP 40422 MastersParadise.970
TCP 40999 DiemsMutter.110, DiemsMutter.140
TCP 41626 Shah.100
TCP 44444 Prosiak.070
TCP 45673 Akropolis.100, Rocks.100
TCP 47262 Delta.050
TCP 48006 Fragglerock.200
TCP 49683 HolzPferd.210
TCP 50000 Infector.180
TCP 50130 Enterprise.100
TCP 50766 Fore.100
TCP 51234 Cyn.210
TCP 51966 Cafeini.080, Cafeini.110
TCP 54321 PCInvader.010
TCP 57341 NetRaider.100
TCP 57922 Bionet.084
TCP 58008 Tron.100
TCP 58009 Tron.100
TCP 59090 AcidReign.200
TCP 59211 DuckToy.100, DuckToy.101
TCP 59345 NewFuture.100
TCP 60000 DeepThroat.300, MiniBacklash.100, MiniBacklash.101, MiniBacklash.101
TCP 60411 Connection.100, Connection.130
TCP 60412 Connection.130
TCP 60552 RoxRat.100
TCP 63536 InsaneNetwork.500
TCP 63878 AphexFTP.100
TCP 63879 AphexFTP.100
TCP 64969 Lithium.100
TCP 65000 Socket.100
UDP 1 SocketsDeTroie.250
UDP 666 Bla.200, Bla.400, Bla.503, Noknok.820
UDP 1130 Noknok.800, Noknok.820
UDP 2140 DeepThroat.100, DeepThroat.200, DeepThroat.310
UDP 2989 Rat.200
UDP 3128 MastersParadise.970
UDP 3129 MastersParadise.920, MastersParadise.970
UDP 3150 DeepThroat.100, DeepThroat.200, DeepThroat.310, MiniBacklash.110
UDP 3333 Daodan.123
UDP 3800 Eclypse.100
UDP 3996 RemoteAnything.364
UDP 4000 RemoteAnything.364
UDP 5555 Daodan.123
UDP 5881 Y3KRat.110, Y3KRat.140
UDP 5882 Y3KRat.100, Y3KRat.110, Y3KRat.120, Y3KRat.140, Y3KRat.150
UDP 5883 Y3KRat.110, Y3KRat.140
UDP 5884 Y3KRat.140, Y3KRat.150
UDP 5885 Y3KRat.110, Y3KRat.120, Y3KRat.140
UDP 5886 Y3KRat.120, Y3KRat.140
UDP 5887 Y3KRat.110, Y3KRat.120, Y3KRat.140
UDP 5888 Y3KRat.100, Y3KRat.110, Y3KRat.120, Y3KRat.150
UDP 6953 Lithium.100
UDP 8012 Ptakks.217
UDP 10067 PortalOfDoom.100
UDP 10167 PortalOfDoom.100
UDP 10666 Ambush.100
UDP 11225 Cyn.100, Cyn.103, Cyn.120
UDP 11306 Noknok.800, Noknok.820
UDP 12389 KheSanh.210
UDP 12623 Buttman.090, Buttman.100
UDP 12625 Buttman.100
UDP 14100 Eurosol.100
UDP 23476 DonaldDick.155
UDP 26274 Delta.050
UDP 27184 Alvgus.100
UDP 28431 Hack'a'Tack.2000
UDP 28432 Hack'a'Tack.2000
UDP 28433 Hack'a'Tack.2000
UDP 28434 Hack'a'Tack.2000
UDP 28435 Hack'a'Tack.2000
UDP 28436 Hack'a'Tack.2000
UDP 29891 Unexplained.100
UDP 30103 NetSphere.131
UDP 31320 LittleWitch.400, LittleWitch.420
UDP 31337 BackOrifice.120, OPC.200
UDP 31416 Lithium.100, Lithium.101
UDP 31789 Hack'a'Tack.100, Hack'a'Tack.112
UDP 31791 Hack'a'Tack.100, Hack'a'Tack.112
UDP 33333 Blackharaz.100
UDP 47262 Delta.050
UDP 49683 HolzPferd.210
UDP 60000 MiniBacklash.100

How To Change the text start on windows.

Step 1 - Edit Explorer.exe File
In order to make the changes, the file explorer.exe located at C:\Windows needs to be edited. Since explorer.exe is a binary file it requires a special editor.I have used Resource Hacker for this. Resource HackerTM is a freeware utility to view, modify, rename, add, delete and extract resources in 32bit Windows executables and resource files (*.res). It incorporates an internal resource script compiler and decompiler and works on Microsoft Windows 95/98/ME, Windows NT, Windows 2000 and Windows XP operating systems.
Download
The first step is to make a backup copy of the file explorer.exe located at C:\Windows\ Place it in a folder somewhere on your hard drive where it will be safe. Start Resource Hacker and open explorer.exe located at C:\Windows\explorer.exe.
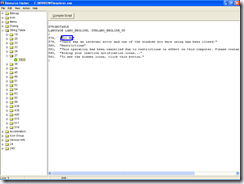
The category we use is "String Table". Expand it by clicking the plus sign then navigate down to and expand string 37 followed by highlighting 1033. If you are using the Classic Layout rather than the XP Layout, use number 38. The right hand pane will display the stringtable. We’re going to edit item 578, currently showing the word “start” just as it displays on the current Start button.  Just double click on the word “start” so that it’s highlighted, making sure the quotation marks are not part of the highlight. They need to remain in place, replace the text  type your new entry. In my case I used  Hit Me.
explorer_hack1
  You’ll notice that after the new text string has been entered the Compile Script button that was grayed out is now active. I won’t get into what’s involved in compiling a script, but prefer say it’s going to make this exercise worthwhile. Click Compile Script and then save the altered file using the Save As command on the File Menu. Do not use the Save command – Make sure to use the Save As command and choose a name for the file. Save the newly named file to C:\Windows.
image
 Step 2 – Modify the Registry
!make a backup of your registry before making changes!
Now that the modified explorer.exe has been created it’s necessary to modify the registry so the file will be recognized when the user logs on to the system. If you don’t know how to access the registry I’m not sure this article is for you, but just in case it’s a temporary memory lapse, go to Start –>run  type regedit in the field. Navigate to:
HKEY_LOCAL_MACHINE\ SOFTWARE\ Microsoft\ Windows NT\ CurrentVersion\ Winlogon
In the right pane, double click the "Shell" entry to open the Edit String dialog box. In Value data: line, enter the name that was used to save the modified explorer.exe file. Click OK.
explorer_hack2
 Close Registry Editor and either log off the system and log back in, or reboot the entire system as u prefer  and u should see your new Start button with the new  text.

Windows Task Manager Alternative - Process Hacker

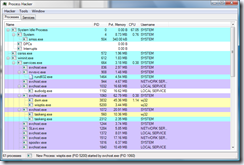
This is for those  who find the Windows task manager a little too short on features.Here is something really good to have.A complete new windows task manager.Not only about the look it also  work  lots better than the default windows task manager.
Process_Hacker
 Task manager only lists running processes, but Process Hacker allows you to investigate where these processes are coming from (even if they are hidden) and displays helpful graphs and statistics about them. Its kernel-mode driver gives the application the power to terminate, suspend and resume all processes and threads, including those that are usually impossible by Window’s task manager.Best of all, it’s an open-source free utility.
Here is the download link:
Download

How To Turn On Num Lock, Scroll Lock, and Caps Lock on Windows Boot.

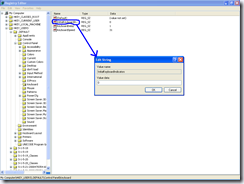
When you start your Computer, Num Lock, Scroll Lock, and Caps Lock don't automatically turned on. You can automatically turn each of them on or off whenever your Compurter starts. But most people probably want to have only Num Lock automatically turned on, but this Registry hack gives you the power to force any combination of keys on or off. Run the Registry Editorand go to:HKEY_USERS\.Default\Control Panel\Keyboard. Find the String value InitialKeyboardIndicators.
key_hack
 By default, it is set to 0, which means that Num Lock, Scroll Lock, and Caps Lock are all turned off. Set it to any of the following values, depending on the combination of keys you want turned on or off:
0         Turns off Num Lock, Caps Lock, and Scroll Lock

1         Turns on Caps Lock

2         Turns on Num Lock

3         Turns on Caps Lock and Num Lock

4         Turns on Scroll Lock

5         Turns on Caps Lock and Scroll Lock

6         Turns on Num Lock and Scroll Lock

7         Turns on Caps Lock, Num Lock, and Scroll Lock

Now exit from the registry and when u restart this will take effect.

Top 15 Windows XP key shortcuts.

This are some windows xp key shortcuts for U.
Key_shortcut
 1) windows key = open or close start menu.
2)Windows key + D = Shows the desktop.
3) Windows key + E = Open windows explorer.
4) Windows key + M  = Minimizes all open windows.
5) Windows key + Shift + M  =  Maximizes all open windows.
6) Windows key + R  =  Shows the RUN dialog.
7) Windows key + F =  Shows Search window.
8) Windows key + Break =  Shows System Properties box.
9) Windows key + TAB =  Go through taskbar applications.
10) ALT + TAB = Cycle through opened applications.
11) Windows key + T = Cycles through programs on task bar. 
12)  Windows key + L  =  switch user.
13) Windows key +  X = Open windows mobility center.
14) Windows key + G = Cycle  through sidebar gadgets.
15) Windows key + U = Open Utility manager.

Secret Codes for Nokia.(Top 16)

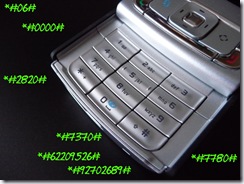
Type the folling codes in NOKIA main screen.
1) *#06# for checking the IMEI. (International Mobile
Equipment Identity).
Nokia_secrets

 2) *#7780# reset to factory settings.
3) *#67705646# This will wash  the LCD display
(operator logo).
4) *#0000# To view software version.
5) *#2820# Bluetooth device address.
6) *#746025625# Sim clock allowed status.
7) *#62209526# - Display the MAC address of the
WLAN adapter.8)  #pw+1234567890+1# Shows if sim have restrictions.
9) *#92702689# - takes you to a secret menu where
you may find some of the information below:
1. Displays Serial Number.
2. Displays the Month and Year of Manufacture
3. Displays (if there) the date where the phone was
purchased (MMYY)
4. Displays the date of the last repair - if found
(0000)
5. Shows life timer of phone (time passes since last
start)
10) *#3370# - Enhanced Full Rate Codec (EFR)
activation. Increase signal strength, better signal
reception. It also help if u want to use GPRS.
11) *#3370* - (EFR) deactivation. Phone will
automatically restart. Increase battery life by 30%
because phone receives less signal from network.
12) *#4720# - Half Rate Codec activation.
13) *#4720* - Half Rate Codec deactivation.Then the phone will restart.
14) wallet code for Nokia S60 phone, use this code to reset: *#7370925538#.
15)*#3925538#  delete the contents and code of wallet.
16) *#7328748263373738# resets security code.

How To Find Virus in computer.

If u find that ur computer is attacked by viruses then u will start scanning your computer with the antivirus.Have u ever try to find viruses yourself without using any antivirus.Sounds quite uneasy na.But yes u can find viruses in your computer without any antivirus.I know that u have a little idea over this viruses.like this viruses are executable files which made by someone to hack ur id,password or to make damage to your computer.But have u any idea of this viruses like  How they are processing on your computer/Who made them run/How they can be called. So for all your answers let me tell u that a virus is always called by a autorun file.Now u will say what is a autorun file.It is a file which is used to make a file run automaticly. If your computer is attacked by any viruses then there must be a autorun file in effected drives.If it is C DRIVE then it will be there just  under C drive In this path “ C:\autorun.inf ”.If u run this in the explorer address bar then it will show:(If your computer is virus affected)file_autorun
 In this case its a trojan horse.It can be anything it depends upon which virus is there in your computer.So this was how to find the name of the virus.Now if u want to find the exact file then….. Just copy the virus name and search for it in the search window and you will find:(In this case)
Virus_demo
 Now if u want to delete it then do it.But it keeps a copy of it again and again.Then wat to do. 1st delete the virus file and then start the scanning…and u will see the virus will be removed.

Who blocked me in Gtalk?

Whenever you see contact in gtalk is offline for many times,then don’t u wanna know  that the person is really offline or you are being blocked.
who-blocked-me-gtalk
 Here is simple way to know it.We use a chatting client Pidgin for this.
1)Download and Install Pidgin:
click here to download.
Now you want to know How to configure Pidgin to work with Google Talk?
2. Configure Pidgin for Gtalk:
1- Get the latest version of Pidgin and Install it on your computer.First page:
g
2- Select “Accounts“-> “Manage“-> “Add
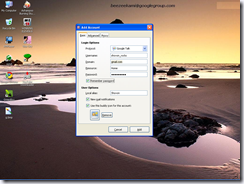
This will open a window Add Account
e
 3- From the drop down box choose Goodle Talk as the Protocol.
4- In case of Screen name enter your Gmail Id ( Shovon_rocks).
5- Type gmail.com as the Domain/Server.
6- In Resource Field enter  Home.
7- Type your Gmail Password in the Password Field.
8- Choose any Nickname (Shovon) as Local alias.
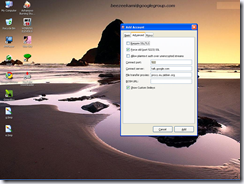
For advanceed settings.
j
 1)Force old (port 5223) SSL : Checked
2)Connect port : 522
3)Connect Server: talk.google.com
4)File transfer proxies: proxy.eu.jabber.org
5)Show custom Smiles: Checked
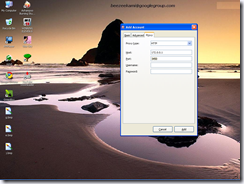
For proxy settings:
k
 Proxy Type: HTTP
Host: 172.0.01
Port: 3450
Username:(gmail)
Password:(gmail)
3. Who’s Blocking You?
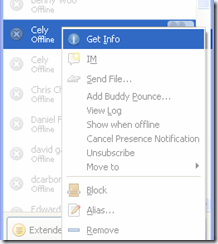
When someone blocked you in Gtalk they appear offline just like your other contacts who are really offline. Right click, click on Get Info, and we’ll see how to differentiate them.
get-info
 Then you will have two  different images for two different cases Actual offline  and Blocked offline. If you are blocked, nothing will be display under Buddy Information.

How To Create Multiple Login for Gtalk.

RIght click on desktop –>  New –> shortcut –> paste the below code in the text box.
"c:\program files\google\google talk\googletalk.exe" /nomutex
a
Name it as whaterer  u want.
use this shortcut for multiple login..

Top 20 useful run commands.

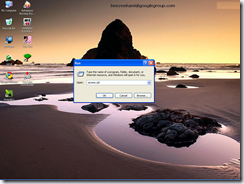
At first click on start then click on run and try this controls:
a
 Accessibility  Options: access.cpl
Add or Remove Programs : appwiz.cpl
Command Prompt : cmd
Administrative Tools : control admintools
Add Hardware Wizard : hdwwiz.cpl
Automatic Updates : wuaucpl.cpl
Calculator : calc
Bluetooth File Transfer Wizard : fsquirt
Certificate Manager : certmgr.msc
Character Map : charmap
Check Disk Utility : chkdsk
Clipboard Viewer : clipbrd
Component Services : dcomcnfg
Computer Management : compmgmt.msc
Date and Time Properties : timedate.cpl
Device Manager : devmgmt.msc
Direct X Troubleshooter : dxdiag
Disk Cleanup Utility : cleanmgr
Disk Defragmenter : dfrg.msc
DDE Share : ddeshare

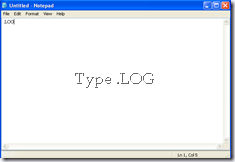
Notepad Notebook

i)First Open notepad from Accessories.

Create Notepad Notebook


ii)Jst type .LOG at the first Line.

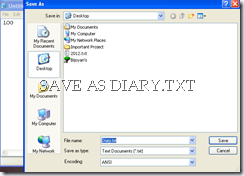
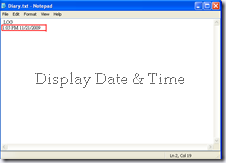
Create Notepad Notebookiii)Save it as Diary.txt then Double-click the file to open and u see that notepad displays the current date and time.Save it.

Create Notepad Notebook

 
iv)Again Double-click the file and again it will display current date and time. 

Notepad Diary

Now u can Type what u have done today and what u have to do next.Use it as ur DIARY.

Check This Out:

How To Disable Display of Drives in My Computer.

 Disable Display of Drives in My Computer.      

Disable display doesn’t cause any damage to ur computer but yes u can make ur friend surprised by doing this.When he will see his PC/LAPTOP drives are gone.                 
To make this happen Go to:


HKEY_CURRENT_USER\Software\Microsoft\Windows\CurrentVersion\Policies\Explorer
Now in the rirht side create a DWORD value name it NoDrives.Set the value to 3FFFFFF (Hexadecimal)
Press ok.Then refresh it using F5.Wait for some seconds and guess what ur drives are gone.
Disable Display of Drives in My Computer.
To get: Ur drives back.

Delete the DWORD file.
Then Press F5.Wait for some seconds as windows will set the display.It will take time.

In this way You get ur drives back.

Check Out This:

PAUSE OFF HEADLINES --